# Introduction
XMReport is a light but very flexible and extendable template printing designer and engine, you can easily build template with complex layout. XMReport provide an online designer which means that you can perform everything like designing and previewing online without installing any native clients, seamlessly integrated into your web projects, besides XMReport provide a series of unique features like:
- Flexible Data Source Support: You can use any kind of object like JavaBean, Map and ResultSet as your data source, or even build it dynamically with scripts.
- Powerful table designing support: You can easily implements any sophisticated layout and table just like what you do in Office Word.
- Extendable: You can event build your own widgets if you don't satisfy with the built-ins.
- Engine run on browser: XMReport can also provide a JavaScript implemented engine, which means that you can generate PDF without invoking an server API, which saves your compute resource.
# Getting Started
The project web-report-springboot is a demo project for integration, which is a typical Maven project, and using technologies like SpringBoot and JPA, NOTE that for simplicity in this project we were using the Derby as database, you can refer to file 'persistence.xml' for more details. This project contains the minimal API implementations that will be invoked by the designer, like template CRUD APIs, and an API for template preview. Followings are some explanation for some directories.
src/main/resource/static The designer resources HTML and javascript files, these resources would be accessed by browser and run. When you update the designer, just replace those files with the new ones. src/main/java/org/mosmith/tools/website/storage/preview/ReportController.java The preview API invoked by the designer, which accept the request parameters and call the engine to generate the documents like PDF, Word, Spreadsheet, Image, etc. You can refer to this file for some codes about how to invoke the engine and generate the documents from template and data. src/main/java/org/mosmith/tools/website/storage/template/TemplateManagerController.java The API implementation of template management that invoked by the designer. src/main/java/org/mosmith/tools/website/storage/datasource/DataSourceTemplateController.java The API implementation of data source template management that invoked by the designer. Note that this API is optional if you don't want it since the data source is just an assistance for template designing, but you can just write the scripts without dragging/dropping the fields from data source manager. src/main/java/org/mosmith/tools/website/storage/sharescript/ShareScriptManagerController.java The API implementation of share script management that invoked by the designer. Note that this API is optional if you don't want to use the share script.
Following are some commands to compile and run the demo project:
## Install the engine to local repository, NOTE: you must run this command within the directory of file 'web-report-engine-1.1.jar'
$ mvn install:install-file -Dfile=web-report-engine-1.1.jar -DgroupId=org.mosmith -DartifactId=web-report-engine -Dversion=1.1 -Dpackaging=jar

## Enter the directory of the proejct, compile and package the project:
$ mvn clean install -DskipTests=true

## Run the application
$ java -jar target/web-report-spring-boot-0.1.jar

## Then you can visit the designer with URL: http://localhost:8080/designer.html
And if you want to integrate XMReport engine into your project, please add following maven dependency into you project. Note that you must install the package 'web-report-engine-1.1.jar' into your local repository first with commands above.
<dependency>
    <groupId>org.mosmith</groupId>
    <artifactId>web-report-engine</artifactId>
    <version>1.1</version>
</dependency>
And very easily, you can generate a PDF with just following lines:
import java.io.FileInputStream;
import java.io.InputStream;
import java.io.Reader;
import java.io.InputStreamReader;
import org.mosmith.tools.report.engine.output.ReportHelper;

...

Reader templateDataReader=new InputStreamReader(new FileInputStream("test.template"), "UTF-8"); // Template Data
Object previewData=new Object(); // Data Source

ReportHelper reportHelper=new ReportHelper(); // Helper tools, refer to the implementation of ReportHelper for more details if you want to do some customization.
InputStream pdfIs=reportHelper.toPdf(templateDataReader, previewData); // Execute and return the InputStream of Pdf file.
...
# Designer UI Overview
Please refer to the picture below, there are a few regions in designer, here let me explain what you can do with them in brief.
# ToolBox
The toolbox displays the built-in widgets, to create a widget in canvas, you can follow the steps below, and usually we recommend to use the widget 'Grid' to perform document layout.
- Click the widget to be created,, for example: Text
- Move to the canvas, mouse down, drag out a rectangle, and release.
- When you release the mouse, a text widget is created.
# Font Properties
You can adjust the font styles of selected widgets here, like the font family, size, and color, for example to change the font size of a widget, you can follow the steps below:
- Click the targeted widget on canvas.
- Click the font size drop down list.
- Click the font size from the drop down list, and you can see the updated styles on Canvas.
# Location & Size
Here you can view and set the location and size properties of selected widgets, below is the explanation of each input:
- X, Y indicate the distance of the widget to the top-left of parent container, the unit is 0.1mm.
- W and H indicate the width and height of the widget, the unit is 0.1mm.
- Z represents the index of z direction of the widget. It is similar to the z-index in CSS. When widgets overlap with different z index, the widget with the larger Z value will be displayed on the top.
- Horizontal fill means set the width of selected widgets to the width of the parent widget.
- Vertical fill means set the height of selected widget to the height of the parent widget.
- Adaptive height, indicating that the height of the widget is automatically adjusted according to the content of the widget, but the minimal height will be the value of 'H' input.
- Snap, this is a setting button that has nothing to do with selected widgets. It is used to turn on/off the adsorption auxiliary function of the designer. The adsorption function is used to help users design accurate aligned templates.
- Visible/Not Visible, indicates whether the widget will be displayed when generate the document. For example, some preset paper may already have the company's logo on it, then the logo widget can be set to invisible.
- Appear in every page, indicating that the widget will be print on each page, such as some watermarks, logos, header positions, etc.
- Allow Cross-Page, which means that when the content is too long, the widget will be break and displayed on multiple pages.
# Widget Style/Properties
The property panel contains a series of common styles/properties settings, clicking the style/property button then a setting dialog will be popup, some style/properties cannot be applied to the selected widget, corresponding butttons will be disabled on selected.
# Template Manager
Template manager locates at the left panel, you can create,edit, delete, move, import/export templates, etc. here. Note that the template manager has a concise UI, but provides a series of operation which can be performed by right clicking the nodes. In XMReport the templates were arrange as a tree, which has the similiar concept with filesystem.
# DataSource Manager
XMReport does not require you to define the data source, the real data source is decided by the data you pass into ReportHelper while invoking methods to generate document. So here in designer the data source here is just assistant tools, which describe what fields will be there when you invoke the API to generat documents.
# Component Manager
Component manager provide a tree view of your template. You can quickly search a widget by inputing id in the searchbox, and you can see the widget hierarchy by expanding/collapsing the nodes.
# Share Script
Share script is an optional feature in XMReport, here you can define some scripts what will be commonly used between templates. For example you create a share script file named StringUtils.js and write codes below:
function isEmpty(val) {
    return val==null || val=='';
}
And then in widget data/scripts, you can load the scripts and then invoke the function inside:
//javascript
load('/StringUtils.js');
var value = "";
var valueIsEmpty = isEmpty(value);
...
# Video Tutorials
Also we have posted some video tutorials on youtube:
XMReport Integration Demo Project Introduction (opens new window)
Create a Template with XMRepor (opens new window)
XMReport Data Binding Introduction (opens new window)
XMReport Script Introduction (opens new window)
# Data Binding
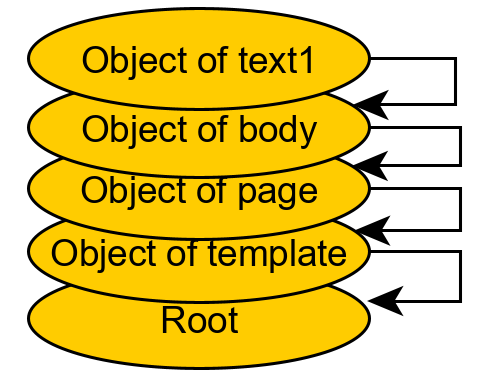
One important concept in XMReport is the data binding, which is talking about how widget find the data and display it. In XMReport every widget can be bound with a data object, the data object here means any Java object. Every time a widget was executed, the engine will push the bound data into a stack, since the widgets are executed from parent to children, so when a widget was executing, the stack status will be like the picture below. When encountering a variable in the script/expression, the engine visit the elements of the stack, in the order of stack popping, for each element:
- If the element is an object, the engine will search the getter method of the variable name, then the public field member, if found then invoke the method or get the field value via reflection and return. continue to step 2 otherwise.
- If the element is an instance of java.util.Map, Map.get(variable) will be invoked and return if Map.containsKey(variableName) is true, continue to step 3 otherwise.
- If element is an instanceof ResultSet, and it contains a column with same name of variable(case insensitive), then ResultSet.getObject(variable) will be invoke and return. continue otherwise.
- Move to the next element.
Note that for the data binding text starts with '=' or '//javascript' will be evaluated as script and engine will take the evaluation of last line as the bound data, otherwise it will be treated just a pure string.
# Executing
Executing here means the process of converting the design widget to the print widget with provided data, normally the behavior of executing was defined by the XMReport engine inside and it contains too many details, so we are not going to talk about that too much here. Note that within the same container, widgets are executed in the order of 'z' property (concept similiar to the css property 'z-index'), widget with lower z will be executed first, if there are widgets having the same 'z', the executing order of them is undefined(random).

The executed widget are output to an execution context and you can see them in later executed scripts with the name of widget, note that widgets not executed are not visible since they doesn't not exist. If a widget was executed more than one time(such as grid, row and cell), then the latest one will be visible.
# Widgets
There are 8 kinds of built-in widgets in XMReport: Template/Page/Header/Footer/Body, Text, Barcode, Image, Straight Line, Grid, Cross Table and Customized Widget. Each of them were for displaying different kind of content.
# Template/Page/Header/Footer/Body
Template is the top-most container, template can contain one or several Pages, you can add more than one page to the template, with different paper size, header and footer. Each page has a Header, Footer and Body. The specific properties for Page, Header, Footer, and Body can be set within the 'Page Setting' panel. When you want to edit the content of Header/Footer/Body, you can double-click the Header/Footer/Body area, then the targeted area will be highlighted with color blue, which indicate what you operate will be restricted within this area.
# Text
Text widget can be used to display pure or rich(HTML) text. But note that XMReport implements the rich text in a light-weight mode, some HTML tags/styles were not supported, such as 'script', 'embed', 'pre', 'input', 'margin'.
# Barcode
Barcode widget can be used to transform the value into barcode and display, and then we can just use the barcode scanner to scan the barcode to perform fast inputting. Note that there is a very important property named 'dpi', which is used for accurate printing, some tag printer has a low dpi, and to print the barcode accurately and clearly, you need to set the 'dpi' value to the printer dpi, otherwise it would cause blur effects to the generated barcode image and could correctly read by the barcode scanner.
# Image
Image widget is used to display a picture, the data of which can be in the following format:
- An byte[] object of the picture.
- A base64 encoded bytes with 'data:xxx/xxx;base64,' prefixed, for example: 'data:image/jpeg;base64,xxxx', the content from the first comma ',' on will be decoded to an byte[] object.
- An URL string, the engine will try to fetch the resources with this URL string.
Note that PDF specification supports JPEG and BitMap format, if you find that the generated PDF was too large, you should consider convert the image format to JPEG or enable the 'Convert to JPEG' in image properties.
# Straight Line
Just a simple line, binding data was ignored, usually used to display some separator lines.
# Customized
You can extend the class PrintWidget, override the print() method and implement it on your way. XMReport engine will load the class specific in the customized widget properties. More advanced you can implement the executor to control the executing process, but this will be complicated. Note that please set either the PrintWidget class name or executor class name, don't set both of them at the same time.
# Grid
Grid is a container for rows, it will push the binding data into the stack, so the rows and cells inside grid can search it first. The grid is much like the Table in MS word, you can merge, split the cells. The Grid widget is powerful but some what complicated.
# Grouping
Group is not a widget, it is a concept/feature of grid, grouping means dividing a list of row data into several groups, which is usually used in grouping the QueryResult, very similiar to the SQL operation 'group by' except that we won't sort the rows before the grouping. As following, if we group the data by field 'BillNo' then the data will be divided into 3 groups by the field 'BillNo': 20180101, 20180102, 20180101, note that the group1 and group3 were in different groups since they are not together, we will start a new group once we discovery a value changed.
| BillNo | Creator | MaterialName | Amount |
|---|---|---|---|
| 20180101 | Mosmith | Paper | 120kg |
| 20180101 | Mosmith | Pen | 100 |
| 20180102 | Mosmith | Notepad | 200 |
| 20180102 | Mosmith | PC | 10 |
| 20180101 | Mosmith | Keyboard | 20 |
| 20180101 | Mosmith | Mouse | 20 |
Groups can be nested, as following group by 'BillNo' and 'Requestor': there are 2 OUTER GROUPS divided by BillNo: 20180101 and 20180102, within group('20180101') there are 2 groups divided by Requestor: group('Mosmith') and group('Andy'), similarly group('20180102') has 2 sub-groups group('Andy') and group('Dall'). Note that the group('Andy') in group('20180101') and the group('Andy') in group('20180102') are two different groups thought they as the same second group value, we use 'INNER GROUP' or 'SUB GROUP' to denote them. Obviously, OUTER GROUPS starts prior to the INNER GROUPS, and INNER GROUPS ends before the OUTPUT GROUPS.
| BillNo | Rqeustor | MaterialName | Amount |
|---|---|---|---|
| 20180101 | Mosmith | Paper | 120kg |
| 20180101 | Andy | Pen | 100 |
| 20180101 | Andy | Notepad | 200 |
| 20180102 | Andy | PC | 10 |
| 20180102 | Dall | Keyboard | 20 |
| 20180102 | Dall | Mouse | 20 |
# Row
Row is the most complicated widget, there are 4 types of rows, Simple Row, Group Start Row, Group End Row, and Detail Row, but most cases we will just use the 'SimpleRow'. If row was bound with an Iterable object, XMReport engine will generate a new row for each element, and bind the generated row with this element. Note that rows are executed one by one from up to down, so you couldn't see the future rows and cells in data binding, prepare and post scripts.
# Simple Row
Simple Row is simple, it is just a container for cells, it will push the bound data into the stack so the cells inside it can search it first. If 'appear-in-every-page' is set, it will be newly executed and displayed in every page, with this feature you can build the table header/footer.
# Group Start Row
Group Start Rows should be placed right before the Detail Row. Note that no other types of rows should be between the Group Start Rows and Detail Rows. Group Start Row has a property named 'Group Field', Every time before the Detail Row being executed, it will lookup the object with name 'Group Field' in the stack, we denoted object with name 'Group Value', if the Group Value changes or OUTER GROUPS starts, the Group Start Rows will be executed.
Note that the data of Detail Row was pushed into the stack before executing the Group Start Rows.
# Group End Row
Group End Row, contrast with Group Start Row, should be placed right after the Detail Row. Note that no other types of rows should be between the Group End Rows and Detail Rows. Group End Row has a property named 'Group Field', Every time before the Detail Row being executed, it will lookup the object with name 'Group Field' in stack, we denoted object with name 'Group Value', if the Group Value changes or OUTER GROUPS ends, the Group Ends Rows will be executed.
Note that the Group End Rows were executed before Detail Row pop the data from stack.
# Detail Row
Detail Row is a special kind of row, whose binding data should be Iterable or an ResultSet object. The engine will iterate over the binding data, for each element, the the Detail Row will be newly executed, until the iteration ends. The Group Start Rows and Group End Rows rely on the Detail Row, there will be no execution of Group Start Rows or Group End Rows if there is no Detail Row.
# Cell
Cell can be a Text widget or a container for other widgets, it is a pure text widget by default, but you can change the type in the Grid/Row/Cell properties panel. It has the same properties with Text widget when the type is Text/HTML. You can place other widgets inside it when the type is Container, note that you need to double-clicking it to create/edit the child widgets of the container, you cannot drag/drop a widget into a container but you can use the copy/cut and paste to copy/move a widget into a container.
Cell widget has a feature name 'Merge Cells with Same Value Above', with which you can merge the cells that have the sames value within same column, and you can enter an expression, engine will evaluate it, take the result to compare will the cell above, and merge accordingly.
# Grid Computation
Like MS Excel, you can perform some grid computation such as Sum, Average, Count in Grid widget, but there is some differences:
- Because of widget execution order (cells within grid were executed from up to down, left to right), the cells or rows performing the grid computation should be place in later rows after the target cells, since you cannot see the future cells. If you want to place the computation result before the target cells, please place a Post Script to a later cell or row, for example:
targetCell.setValue(sum("cellToSum"));
- The target cells are denoted by the name of top-left and bottom-right cells, for example below we will sum the value of cells within the rectangle from "cell1" to "cell8":
sum("cell1", "cell8");
There are 4 kinds of computations: normal(global) computation, group computation page computation and row computation. normal computation will collect all executed cells, group computation collects the executed cells within current group, page computation collects only the executed cells of current page while row computation only collect the cells within current row.
- sum/average/count(global/normal)
- gsum/gaverage/gcount(group)
- psum/paverage/pcount(page)
- rsum/raverage/rcount(row)
As for page number and total pages, there were to methods: 'getPageNo' and 'getTotalPages()'. Note that these two methods will have different behavior in different scenarios:
- When you evaluate them within the group row or the children of group row, it will return the current page number and number of total pages of current group.
- When you evaluate them within grid or the children of grid, not group row, it will return the current page number and number of total pages of current grid.
- Otherwise, return global page number and total pages.
As you can see above, the 'getPageNo()' and 'getTotalPages()' redirect to the real methods according the current widget, you can call the real methods directly also:
- getGroupPageNo()/getGroupTotalPages()
- getGridPageNo()/getGridTotalPages()
- getGlobalPageNO()/getGlobalTotalPages()
Note that 'getTotalPages()' does not return a number since we don't known how many page until the end of execution, instead it returns a placehold string, which will be replaced by the number of total pages after execution completed.
# Cross Table
Cross table was something more like the CrossTab in JasperReport, but the Cross Table in XMReport was more powerful, easy to setup and flexible, but this widget was not frequently and it is a little bit abstract, and it requires specific pattern of data, let's skipt it for now.
# Script
Script is a very import concept within XMReport, in fact there is no data source in XMReport, verything about data binding is implemented by script. There are 4 kinds of scripts for each object:
- Data Binding Script
- Prepare Script
- Post Script
- Final Script
They will be evaluated in different stage of widget lifecycle, and all of them should be written in javascript. The evaluation of last statement will be the result of evaluation of the script. Different widget might have some different build-in objects or methods during evaluation. following are some common built-in objects and methods.
- designWidget: is the runtime object of your design model, you can access to the everything while designing the template like properties, styles, etc. Note that there is only one Design Widget object for each Widget during execution.
- printWidget: is the object that performs real printing function. A Design Widget will be converted to one or more Print Widget during the executing process, most cases Print Widget has a copy of properties and styles from Design Widget. What you operate on the Print Widget like changing the properties or styles will not affect the Design Widget.
- executeContext: There is only one ExecuteContext object and it lives thoughtout the whole executing process. If you want to record something and use in later widgets, put it into the executeContext and fetch it later using the setProperty()/getProperty() methods, and what you set via setProperty() will be globally visible and later you can access to it with key name directly.
And you can also interact with java objects in the script, packages 'java.lang' and 'java.util' are imported by default, you don't need to write the full-qualified name for classes within those packages, for example:
//javascript
importPackage(java.io);
var fs=new FileInputStream("d:/test.txt");
var sb=new StringBuilder();
try {
    var br=new BufferedReader(new InputStreamReader(fs, "utf-8"));
    var line;
    while((line=br.readLine())!=null) {
        sb.append(line);
        sb.append("\n");
    }
} finally {
	fs.close();
}
sb.toString();
# Data Binding Expression
Data Binding Expression is used to determine the bound data of widget, the evaluation result of the script will be bound to the widget. Except for looking up field in the data stack, you can also build the data using scripts. Data Binding Expression is executed before the Prepare Script. Note that only the evaluation value will be pushed to the data stack and visible to child widgets, others like intermediate variables within scripts will be discarded.
# Prepare Script
Prepare Script is executed before engine converting the data into widget secific data(for example: for Image widget, the bound data (byte[] or URL) will be converted to java.awt.Image object, and another example is that engine will convert the data into display content(text) according to the data format settings). So you can perform some operations to PrintWidget during Prepare Script. The evalution result of the script will be ignored.
# Post Script
Post Script is executed after the engine converting the Design Widget into Print Widget. So you can do some customization to the final Print Widget, for eample add some prefix to the content like 'SAY US DOLLARS', set the widget styles according to the values. The evaluation result of the script is ignored.
# Final Script
Final Script is executed after the whole execution done. Since you cannot see the future executed widgets during widget execution, after the whole execution done, you can see the all information like generated Print Widgets, total pages, etc. For example, the total pages, for examples we minus the page number and total pages by 2:
// Data Binding Expression
=getPageNo() -2 + '/{totalPages}'
// Final Script
var content = printWidget.getContent();
content = content.replace('{totalPages}', (getTotalPages()-2) + '');
printWidget.setContent(content);
# Commonly Used Built-In Functions/Objects
# Print Widget
printWidget.setProperty(propName: string, propVal: string): void
Set a property to the Print Widget, you can use it to record some data on this Print Widget, another usage of this function is to set some hidden(not visible on designer) propertys like 'htmlAttrs'.
printWidget.getProprty(propName: string): string
Fetch a property value of Print Widget
printWidget.setValue(value: Object): void
Set the bound value of Print Widget, by default value will be converted to display content according to data format: (value) ==(data format)=> (content)
printWidget.setContent(content: string): void
Set the display content of Print Widget, content is different with value thought content is usually converted from value, value is used for computation while content is for displying. If you just want to customized the content without changing the value, please use setContent().
printWidget.setX/setY/setWidth/setHeight(x/y/width/height: number)
Set the size and position of Print Widget.
# Built-In Functions
lookup(name: string): Object
Lookup a value with parameter 'name' within data stack, for lookup details you can refer to the section 'Data Binding' above.
get(propName: string): Object
Get global variable with given parameter 'propName', same with executeContext.getProperty()
set(propName: string, propValue: Object): void
Set global variable with given name and value, same with executeContext.setProperty()
getGlobalPageNo(): number
Get global page number.
getGlobalTotalPages(): string
Get global total pages, note that this method return an placeholder string since we could not know the total pages until execution done, engine will replace this placeholder with real total pages number on execution completed.
format(value: Object, formatExpression: string): string
This function is used to formatting values, the parameter 'formatExpression' is much like the data format expression in MS Excel, you can see some examples in 'Data Format' property panel. Below are some usage examples:
1.	format(9999, '[CN,RMB]'); // return 玖仟玖佰玖拾玖元整
2.	Format(12.888, '0.00'); // return 12.89
htmlEncode(value: string): string
Encode a text with HTML encoded way, for example:
1. htmlEncode('Hello\nWorld, 1+1>2'); // return 'Hello<br/>World, 1+1>2'
urlEncode(str: string): string
Similiar to encodeURIComponent(), escape the keywords in value in URL way.
replace(value: string, from: string, to: string): string
Corresponding to java.lang.String.replace(), because of the conflicts of string types in JavaScript and Java, in JavaScript you need to use RegExp to do the global replacement, which is not very convenient, so we add this built-in functions.
parseDate(dateStr: string, format: format): java.util.Date
Parse a date string value with given format pattern, which use java.lang.SimpleDateFormat to make up the support to Date parsing of JavaScript, for example:
parseDate(“2021-12-12”, “yyyy-MM-dd”)
getYear()/getMonth()/getDate()/getHours()/getMinutes()/getSeconds(): number
Utility functions to retrieve the year, month, date, hours, minutes, and seconds value.
new(Bytes/Ints/Longs): (byte[]/int[]/long[])
Create an byte[], int[], long[] Java array object, JavaScript grammer does not support create Java array object for now, for example:
var bytes=newBytes();
var ints=newInts();
var longs=newLongs();
findPrintWidgets(containerPW: ContainerPW, id: string): PrintWidget[]
Find a Print Widget by id within given container Print Widget, this function will return an array since widget iteration, for example a row bound with a list, will generate multiple rows.
getDesignWidget(widgetId: string): DesignWidget
Find a Design Widget by given id.
findDesignWidget(containerDW: ContainerDW, id: string): DesignWidget
Find a Design Widget by id with given container Design Widget
# Data Source
Data Source is just something assistant to template designing, you can do the data binding by dragging and dropping with a data source.
In fact the Data Source concept in XMReport is not an connection to the data base or something else, it is just a document to describe your data, and there is no Data Source during template execution, everything is script, and finally decided by the data you pass to the engine. You can define your data source with following formats:
Simple-Mode, start with "/// type=demo", and write a JSON with following format:
/// type=demo
{
    field1: 'expression of field1',
    field2: {
        subField1: 'expression of subField1',
        subField2: 'expression of subField2'
    }
}
Or if you have a demo data:
/// type=demo, ignoreValue=true
{
    field1: 'expression of field1',
    field2: {
        subField1: 'content here will be ignored',
        subField2: 'content here will be ignored'
    }
}
Comprehensive-Mode, each field need an element to describe.
[
    {name: 'field1', expression: '=expression of field'},
    {name: 'field2', expression: '=expression of field'},
    {name: 'field3', expression: '=expression of field', children: [
        {name: 'subField1', expression: '=expression of field'},
        {name: 'subField2', expression: '=expression of field'}
    ]}
]
And even more, you can define how to decode the template, and then return a Comprehensive-Mode formatted JSON to XMReport, by defining your decode function in designer.html, like following:
window.config={
   dataSourceTemplateParser: {
       accept: function(content) {
           if(content.indexOf('/// type=ckey')==0) {
               return true;
           }
           return false;
       },
       parse: function(content) {
            var model=eval('var model; model=' + content);
            var ckey=model.ckey;
            // process via ajax ... jQuery is window.jq

            return {
                expression: '='+ckey,
                children: [
                    {name: 'field1', expression: 'expression of field1'},
                    {name: 'field2', expression: 'expression of field2'}
                ]
            }
        }
    }
}
# Q&A
Error message was not shown completely
Since error message contains the stack trace, it would be pretty long so you need to set global property to enlarge the message length limit before the execution of the script:
set('exceptionMsgLengthLimit', 50000);Generated PDF that contains images is very big
You need to enable the 'Convert to JPEG' for Image component, and if you have images in Header and Footer, you might need to use the following code in your Post Script to reduce duplicated image bytes:
1.printWidget.setProperty("pdfImgSerialId", "image1"); // Reused ID
2.printWidget.setCacheImgInExecuteContext(true); // Cache it
How to debug a script
Sorry for that since in XMReport you cannot debug the code like other programming language within an IDE. You can write your code in a Text widget, and preview it with HTLM format, then if there is an error, Text widget will display the invoke stack, otherwise it will display the content of the evaluation result of the script.
Following are some useful code for debugging:
1. set('exceptionMsgLengthLimit', 50000); // place this code before the targeted scripts, so that text widget can display the full message
2. JSON.stringify(data); // Stringify a data to JSON, so that text widget can display the data details.
How to change the URL prefix (host and port) of designer
You can open the designer.html, goto the line 'window.config = ...', add/edit the field 'urlPrefix', and then all the API invoked by the designer will be prefixed with configured value.
How to set token/authorization header for designer
- Attach the URL to the designer.html, for example: designer.html?token=xxx
- Open designer.html, goto window.config, add header function and return the customized headers, for examples:
window.config={
   ...
   headers: function() {
      return {
         Authorization: 'xxx'
      }
   }
}